#raspberry pi digital screen
Explore tagged Tumblr posts
Visit Tumblr Blog
Explore Tumblr blogs with no restrictions, modern design and the best experience.
Last Seen Tumblr Blogs


Fun Fact
Tumblr’s website traffic is steadily declining.
Text
Okay, I'm in the research and resource-compilation stage of this Laika project. Dimensions on this are going to be specific enough that I will have to fully mock this up before I can start on the ceramic part of things (though I suppose I could work on Laika herself; we'll see). Rough dimensions on this are looking like probably 24 inches tall, 12-14 inches wide, and 6-8 inches deep.

The upper half of this piece would be relatively straightforwards, from a construction standpoint--layers of ceramic and glass to make a flickering star backdrop for Laika like the one I have in my living room clock of the world. I may do some kind of visible element of the rotating disc layer--maybe do a laser cut sheet of metal with engravings, or some kind of cloisonné with colored enamel illustrations? Doesn't really matter at this stage, that's decorative problems to be figured out later. Tech here: rotating motor, LED backlighting, and some laser cutting.
The bottom half of this is where things get thorny. Laika's capsule had a tiny, 6 inch window* that she presumably could see out of. I want to find a little silver porthole of approximately the correct size, and embed it in the front face, looking into the depths of the piece, where I'm thinking I will rig up a screen looping video footage of Laika herself (a bit limited, since there doesn't seem to be a lot of video of her; little of it in color and all of it the sort of resolution one would expect from 1957), ideally edited so it's sort of scaled like she's in the capsule. Then, screen brightness and venue light levels permitting, I think I want to try for a pepper's ghost effect, in the space between Laika and the porthole. If I can get the light levels to work, which will be tricky, I would have the pepper's ghost show a view of the earth from orbit--that wide, low, curved horizon, moving from light to day, almost like you're seeing a reflection of Laika's view, hovering transparently in front of her. This means I need to trawl the digital archives of various space programs for appropriate footage (thankfully they have TONS of free use video and photos, but there's an almost overwhelming amount to trawl through.)

I think I can get away with just using digital picture frames for my video displays, which may be easier than raspberry pi's. We'll see.
The very bottom would be the rolling reel for a tiny embedded music box, playable in the bottom corner. Details very rough still!
*at least according to my very preliminary research; books shall be arriving in the mail this week.
681 notes
·
View notes
Text
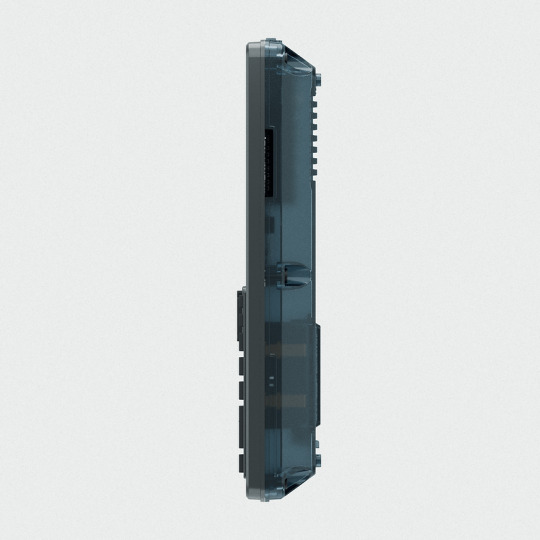
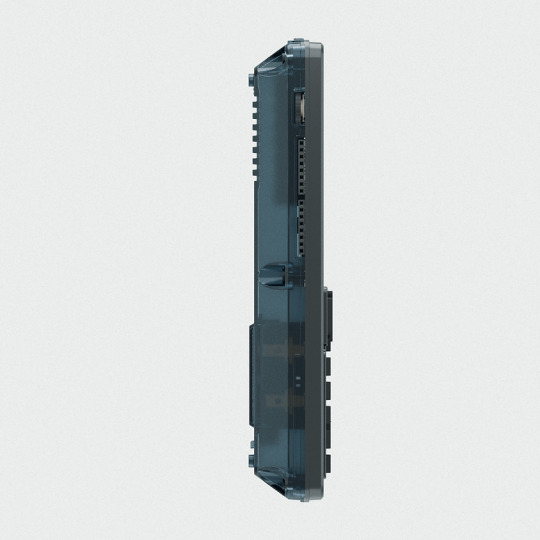
clockwork PicoCalc
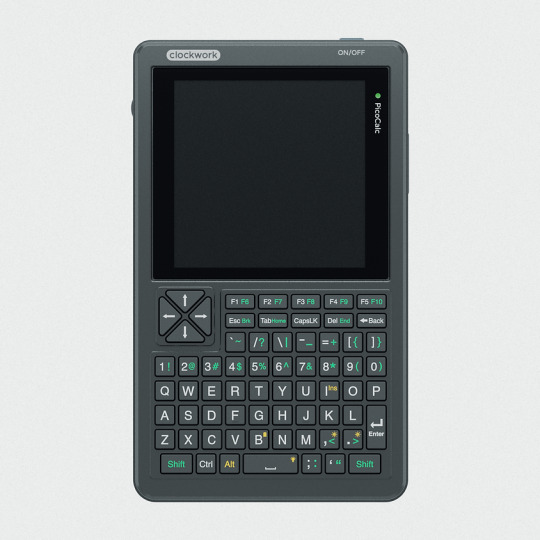


clockwork PicoCalc Back to Basics, rediscover the Golden Age of Computing
Code in BASIC, explore the magic of Lisp, taste the elegance of Unix, play retro games and digital music all in just 260KB memory. Infinite possibilities, inspired by the genius in you!
ClockworkPi v2.0 mainboard
Raspberry Pi Pico 1 H Core module (ARM32-bit Dual-core Cortex M0+, 264KB RAM, 2MB flash)
320x320 4-inch IPS screen (SPI interface)
Ultra-portable QWERTY Backlit keyboard on board (I2C interface)
Dual speaker
ABS plastic shell & 2.5mm Hex key
Tempered glass cover
32GB high-speed SD-card with optimized BASIC firmware
source: clockworkpi.com
7 notes
·
View notes
Text
new bucket list attempt everything on this list at least once
Master list of creative hobbies
Art creative hobbies
1. Botanical illustration
2. Architectural drawing
3. Urban sketching
4. Comic and manga illustration
5. Children’s book illustration
6. Digital art and design
7. Figure drawing
8. Fashion illustration
9. Mapmaking
10. Doodling and zentangle
11. Sticker making
12. Coloring books (for adults)
13. Paint by numbers
14. Diamond painting
DIY creative hobbies and crafts
15. Soap making
16. Resin molding
17. Button making
18. Candle making
19. Basket weaving
20. Terrazzo
21. Sand art bottles
22. String art
23. Perler beads
24. Seed beading
25. Wreath making
Industrial creative hobbies
26. Woodworking
27. Woodturning
28. Wood burning (pyrography)
29. Glass blowing
30. Glass etching
31. Stained glass art
32. Concrete molds
33. Jewelry making
34. Leather working
35. Metalworking and welding
36. Metal embossing
37. Mosaics
Sculpting and carving hobbies
38. Sculpting
39. Ice sculpting
40. Wood carving
41. Pottery
42. Soap carving
43. Sand sculptures and sandcastle building
Printmaking creative hobbies
44. Linocut printmaking
45. Woodcut printmaking
46. Screen printing
47. Rubber stamping
Needlecraft creative hobbies
48. Sewing
49. Cosplay
50. Embroidery
51. Cross-stitching
52. Crewel
53. Needle felting
54. Quilting
55. Crochet
56. Amigurumi
57. Knitting
58. Arm knitting
59. Needlepoint
Fiber arts hobbies
60. Visible mending
61. Macrame
62. Weaving
63. Rug tufting
64. Punch needle
65. Latch hook
66. Lace making
67. Dreamcatchers
Miniature creative hobbies
68. Model building
69. Painting miniatures
70. Dollhouses
71. Fairy gardens
72. Bonkei
73. Diorama making
74. Putz houses and nativity scenes
75. Lego MOC
Stationery and lettering hobbies
76. Calligraphy
77. Hand lettering
78. Art journaling
79. Bullet journaling
80. Card making
81. Scrapbooking
Papercraft creative hobbies
82. Origami
83. Papercraft modeling
84. Paper quilling
85. Collage art
86. Paper making
87. Bookbinding
88. Pop-up making
89. Paper mache
Digital creative hobbies
90. 3D printing
91. Stop motion animation
92. Graphic design
93. Photo manipulation
94. Game development
95. Raspberry Pi
Plant-related creative hobbies
96. Bonsai
97. Tree shaping (Pooktre)
98. Terrariums
99. Aquascaping
100. Flower pressing
101. Flower arranging
102. Topiary gardening
103. Seed art
104. Rock gardening
Other creative hobbies and crafts
105. Puzzles
106. Sudoku
107. Crossword puzzles
108. Writing
109. Learning a foreign language
110. Cooking
111. Music
112. Photography
113. Dancing
114. Sports
115. Improv
116. Nail art
117. Baking
118. Magic
119. Tarot cards
120. Card stacking
121. Collecting
14 notes
·
View notes
Note
WARNING: LONG ASK INCOMING
For hobby electronics there’s two major kinds of processors: Microcomputers and Microcontrollers. Microcomputers are small full computer systems like the Raspberry Pi, they typically run a general-purpose OS (typically some flavor of Linux) and are useful for the kinds of projects that require basically a full computer to function, but not necessarily individual sensors. They’re a great place to start for people who don’t know a whole ton about programming or working with individual components because they typically can output a true GUI to a screen and have the capabilities of a regular desktop computer. They have a main processor, true RAM, and either large on-board storage space or a way to read a storage device, like an SD card.
Microcontrollers are less complicated (component wise) than microcomputers, but as a result are more difficult for total beginners to begin working with. They’re typically primarily a SoC (System on a Chip) processor without discrete RAM modules and a very small EEPROM (on-ship storage space) and need to have components wired and configured to them to be able to do much more than being a fancy calculator. They’re used for when you need something to carry out electronic functions or get sensor readings, but not necessarily a full operating system, so they’re best suited for small/integrated applications. Your helmet uses a microcontroller to control the LEDs you used in the Cunt Machine post.
I build high-power model rockets as a hobby and with my university team, so I work with both kinds of processor as part of designing payload systems. I typically prefer microcontrollers in these as most of what we do doesn’t need an actual OS to run, and they’re smaller/lighter than microcomputers. One of the advantages of a microcontroller is that it runs a Real-Time OS (RTOS) which forgoes all the user-friendliness of things like windows and linux to instead be the bare minimum backend necessary to run code uploaded into the processor.
The main advantage of using a microcontroller is really that they’re typically a lot cheaper than microcomputers are and are plenty powerful for really embedded applications. They also make other parts of whatever system is being built cheaper/easier to integrate because they require less overhead to function - the raspberry pi needs a minimum of 5 volts of power to work, while a chip like an ESP32-PICO can run at 1.8V.
The main way you make sensors/buttons/peripherals work with a microcontroller is via digital communication busses. There’s a few protocols, the most common being I2C, SPI, and UART. I’ll talk about I2C since that’s generally the most common. With I2C each component is assigned a 2-byte “address” that they’re identified by. When the controller sends a request signal on the I2C data bus, every sensor along the line will return their own signal, marked with their address so that they can be identified. It allows for a large number of devices to be put on the same lines and you can daisy-chain them through each other to the microcontroller.
I’ll be honest I really can’t think of a good way to say much more on the subject as like a starting message because I’ve been working with computers so long all the tech stuff for me is second nature, but if you have any questions ask away I can probably answer them or google them.
.
#AAAAAAAAAAAAAAAAAAAA TY INFORMATION#no yeah this is either really beginner friendly or. friendly to how much i have learned so far#tysm!!!! your insight is consistently so helpful <3#ask#lobsterbitches
27 notes
·
View notes
Text


GUESS WHO FOUND AN ORGAN FOREVER AGO?
Found an organ (psure it's an AceTone B-422) on the side of the road one day while some guy was clearing out his dad's house, and managed to get this organ for free. Dude said he didn't get a chance to try it out, nabbed it anyway and stuffed it in my room.
Turns out, it doesn't work.
Turns out, it has a bunch of built in features that DO work.
There's a built in vibrato, a built in reverb, a built in Rhythm Ace Drum Machine, and a God Damn Leslie-branded rotary speaker built in. The drum machine, speaker, and rotary speaker all for sure work, and since it's a 60s organ that reverb is pmuch guaranteed to be a spring tank, which is easy to repurpose. The vibrato would be cool to mess with, too. Lastly, there's a "Brilliance" switch which I'm really curious about.
As for the rest of the organ, I have a bunch of options:
1. I rip out all the keys, replace them with modern midi controllers, and turn the whole thing into a custom recording station. Problem is, the two keyboards are 44 keys each, which is pretty rare for midi controllers. They're also bigger keys than normal, so maybe there's a way to make them work, but that also makes the depth of the keys an issue I'll have to tackle. It also means the 13 bass pedals would be useless.
2. I get 1-4 Arduino boards, and rewire the keyboards so I have 2 44-key controllers, 13-pedal controller, and if I wanna get crazy with it the swell pedal and whatever other knobs I want for midi controls. Problem is, I know nothing about Arduino or digital midi, and I'm already diving headfirst into several unfamiliar disciplines for this project as is. DOUBLE problem is, from what I can tell it would be difficult if not impossible to make the original keybeds velocity sensitive. Triple problem is, if I do decide to toss the key beds, I can't go back and Arduino it up later. I'm not gonna be able to hold onto those parts, and there's no way I could justify having a whole second house organ just to reattempt it.
3. I cut my losses, rip out the relevant electronics, and toss the rest
If I go with either of the first two (read: fun) options, it's also worth considering all the space around the keys, where I can theoretically add whatever. I've tossed around the idea of putting a 2x4 group of drum pads, maybe some knobs or even a ribbon controller somewhere. I could even put a screen there, either with real time feedback or built in synths or digital effects (maybe a raspberry pi or small computer affordable to run soundfonts or even VSTi's natively; imagine having a DIY touch screen with drawbars next to the keyboard to adjust settings, that'd be sick)
And none of that takes into consideration the multitude of cosmetic modification options possible; Paint, veneer, upholstery, LEDs, lights, VU meters, metalwork, leather, the list goes on.
I've got a bunch of ideas and I'm in the process of getting the tools together to move forward with this project.
I'm sure I can also upgrade stuff in the future.
But I'm seriously considering turning this thing into the ultimate keyboard performance desk, both for YouTube stuff as well as live (since, theoretically, it'll be a LOT lighter once the speakers and motor(s) are pulled out)
If anyone has experience with doing any of this sort of thing, I'd love to pick your brains for more info on all this stuff. Working on researching for a YouTube video about the project, including a history of the Ace Tone company that made it (with probably too much emphasis on it being founded by the same dude who founded Roland several years later).
It's a big project, but I think it'd be worth it. I'm more excited about this than I have been about virtually anything else in years.
#organ#keyboards#midi#diy#prog rock#midi controller#synths#synthesizer#AceTone#Roland#music#instrument#piano#leslie#rotary cabinet
4 notes
·
View notes
Text
Top Innovative STEM Lab Solutions for Schools and Colleges in 2025

In the ever-changing academic environment of today, education has no longer stayed tethered to books and lectures. Because of the real world, schools, colleges, and training institutions are heavily investing in Innovative STEM Lab Solutions to provide a balance between theory and practice. These modern setups have allowed students to hone their scientific, technological, engineering, and mathematical abilities through experimentation, problem-solving, and design thinking.
For those teachers, administrators, or institutions willing to update their infrastructure, the following are the main STEM lab solutions that will make a difference in 2025.
Modular lab stations
A modern STEM lab is, by definition, very flexible. Modular lab stations are perfect in a school where the space must sometimes be used for robotics, sometimes for chemistry, and sometimes for electronics. These stations usually have moving workbenches, moving storage, and integrated power supplies, making them perfect for interdisciplinary learning.
Why it works:
Efficient use of space
Facilitates teamwork and solo work
Adapting to different grade levels and projects
Robotics & Automation Kits
Being widely accepted in industries, automation is the need of the hour for STEM kits. Robotics kits consist of Programmable Robots, Sensors, Servo motors, and AI Integration kits that allow students to build their robots, program them, and control them.
Our Top Picks:
Arduino-based Robotics Platforms
LEGO® Education SPIKE™ Prime
Raspberry Pi + sensor modules
The kits offer an excellent opportunity to market coding and engineering skills in a manner that is both entertaining and practical.
FDM 3D Printers and Rapid Prototyping Setup
3D printers are no longer a luxury—they remain a must-have. They enable students to build their prototypes, test their mechanical models, and engage in product design. Increasingly, schools are embedding 3D printing into STEM pedagogy so that students can apply their knowledge to solve real-world problems.
Benefits:
Enhances spatial and design thinking
Promotes iteration and creativity
Encourages integration across various subjects (science and art, for instance)
Interactive Digital Boards and Simulation Tools
Chalk and blackboards are a thing of the past. Digital smart boards and simulation software enliven the abstract concepts of STEM, such as chemical reactions or circuit UML diagrams. Teachers have real-time data at their fingertips, can draw on touch screens, and engage students in solving problems together.
Combined with Arduino simulators, circuit design software like Tinkercad, or tools for virtual dissection, it makes the lab intelligent and fun.
IoT- and AI-Based Learning Modules
In 2025, IoT- and AI-based experiments will be part of every competitive mainstream STEM education. Cutting-edge labs are equipped with sensors, cloud dashboards, and microcontrollers to help students build all kinds of smart projects, such as home automation projects, temperature monitoring systems, or AI chatbots.
The solutions prepare the students to think beyond conventional science and prepare tech jobs of the future.
Curriculum-Aligned STEM Kits
Curriculum-aligned STEM kits, thus, remain relevant for teaching. These kits are uniquely designed to meet the lesson plans, experiment manuals, safety instructions, and real-world problem-based learning content required by the curriculum. They are made for specific classes and subjects with which CBSE, ICSE, IB, or state boards can identify.
Features to look for:
Subject-specific kits (Biology, Physics, Chemistry)
Safety compliance (CE, ISO certifications)
Teacher guides and student workbooks
Cloud-Based Lab Management System
Heading into 2025, cloud-based lab management platforms are becoming more and more popular. This allows instructors to track inventory, log student experiments, manage schedules, and upload student reports onto the cloud, thereby cutting down the paperwork and boosting the efficiency of the lab as a whole.
STEM-Learning Corners in Classrooms
These STEM corners in regular classrooms find favor with many schools, especially for the many that do not have the funds for the full-blown labs. Here little places house essential kits, puzzles, experiment tools, and DIY stations where students can entertain themselves exploring topics on their own.
This makes the STEM field much more approachable and far more interesting from an early age.
Conclusion
The year 2025 marks a decision point for investing in Innovative STEM Lab Solutions: choosing to invest is no longer an option but really a must. Through robotics kits, IoT modules, and modular workstations, these solutions pre-emptively prepare students for the future by instilling critical thinking, creativity, and problem-solving abilities.
If your institute is planning a STEM lab upgrade, select the supplier who understands academic requirements and contemporary technology trends. Tesca Global has earned recognition as a name offering second-to-none, affordable, and curriculum-aligned STEM lab solutions customized for schools, colleges, and universities worldwide.
#laboratory equipment suppliers#developers & startups#educational lab equipments#business#news#photography#technology
0 notes
Text
Big Screen Fun: The Ultimate Guide to Connecting Your Raspberry Pi to a Projector in 2025 In 2025, the humble Raspberry Pi continues to punch above its weight, offering incredible versatility at an affordable price. Whether you're building a home theater, running a presentation, creating a digital art installation, or indulging in retro gaming, connecting your Raspberry Pi to a projector is an excellent way to bring your ideas to life on the big screen. With a variety of Raspberry Pi models on the market — including the powerful Raspberry Pi 5, the compact Pi Zero 2 W, and the reliable Pi 4 — understanding their video output capabilities is the first step toward a smooth setup. This comprehensive guide will walk you through how to connect a Raspberry Pi to a projector in 2025, covering everything from cable choices to resolution tweaks and troubleshooting. Understanding Raspberry Pi Video Output Before connecting to a projector, it’s essential to know your Pi’s video output ports: Raspberry Pi ModelVideo OutputNotesPi 52× Micro-HDMISupports up to 4K @ 60HzPi 42× Micro-HDMISupports dual displaysPi 3, 2, B+Full-size HDMI1080p @ 60HzPi Zero / Zero 2 WMini-HDMI1080p capableAll ModelsComposite via GPIO or AV jackFor analog displays Key points: HDMI is the preferred output for modern projectors. Micro-HDMI and Mini-HDMI require adapter cables to convert to full-size HDMI. Supported resolutions range from 480p to 4K, depending on model and projector compatibility. Make sure you have the correct video cable or HDMI adapter for your specific Raspberry Pi model and projector. Connecting Your Raspberry Pi to a Projector: Step-by-Step Guide 1. Physical Connection Step 1: Identify Ports On your Raspberry Pi, locate the correct video output: Pi 4/5: Micro-HDMI (use Micro-HDMI to HDMI cable) Pi 3: Full-size HDMI Pi Zero: Mini-HDMI (use Mini-HDMI to HDMI cable) On your projector, find the HDMI or VGA input port. Most modern projectors have HDMI; older ones may only support VGA. Step 2: Choose the Right Cable HDMI to HDMI: Best option for digital projectors. Micro-HDMI to HDMI: Required for Pi 4/5. HDMI to VGA: Requires active adapter (with power via USB). Step 3: Connect While Powered Off Turn off both the Raspberry Pi and the projector. Connect the video cable securely between the two devices. 2. Powering On Power on the projector first to allow it to initialize. Then power on the Raspberry Pi by plugging in the power supply. 3. Select the Correct Projector Input Use the projector's remote or onboard controls to choose the correct input source: Common options include: HDMI1, HDMI2, VGA, or AV. Wait a few seconds — the Pi should auto-detect the projector and display the desktop or boot screen. 4. Raspberry Pi Display Configuration (if needed) In most cases, the Pi will auto-adjust the output to match the projector’s resolution. If you experience black screens, resolution mismatches, or cropped images, manual configuration is required. Option 1: Using raspi-config Open a terminal: bashCopyEditsudo raspi-config Navigate to: Display Options > Resolution Choose a compatible resolution (e.g., 1920×1080, 1280×720) Finish and reboot. Option 2: Manually Edit config.txt Open the configuration file: bashCopyEditsudo nano /boot/config.txt Add or edit the following lines: iniCopyEdithdmi_force_hotplug=1 hdmi_group=2 # 2 = DMT (for monitors/projectors) hdmi_mode=82 # 82 = 1080p @ 60Hz Other useful options: iniCopyEdithdmi_drive=2 # Enables HDMI audio disable_overscan=1 # Removes black borders Save and reboot: bashCopyEditsudo reboot For a full list of hdmi_mode values, refer to the Raspberry Pi video documentation. 5. Adjust Projector Settings Use the projector’s focus ring, keystone correction, and zoom features to align and sharpen the image. For digital projectors, this may also be handled via the settings menu.
Common Issues and Troubleshooting 1. No Signal Check that cables are firmly connected. Verify that both devices are powered on. Confirm the projector input source is correct. Try a different HDMI cable or port. Force HDMI detection using hdmi_force_hotplug=1. 2. Incorrect Resolution or Aspect Ratio Use raspi-config or edit config.txt to manually select resolution. Adjust the aspect ratio settings on the projector (e.g., 16:9 or Auto). 3. Flickering or Distorted Image Use a high-quality HDMI cable. Ensure the Raspberry Pi has a 5V/3A power supply. Avoid long HDMI cables (keep under 6 ft if possible). 4. No Sound via HDMI Enable HDMI audio in the config: iniCopyEdithdmi_drive=2 Set audio output to HDMI via: bashCopyEditsudo raspi-config Navigate to Advanced Options > Audio > HDMI. Check if the projector has internal speakers or external audio support. 5. Projector Doesn’t Detect Pi Reboot both devices. Confirm hdmi_force_hotplug=1 is set. Check if the cable or adapter is faulty. Optimizing Your Raspberry Pi for Projector Use 1. Choose the Right Pi Model Raspberry Pi 5/4: Ideal for 4K video, gaming, or media centers. Raspberry Pi Zero 2 W: Great for lightweight slideshow or digital signage. Older Models: Suitable for presentations or basic playback. 2. Use a Stable Power Supply An underpowered Pi can cause display flickering or boot failures. 3. Install Useful Software VLC or Kodi for media playback. LibreOffice Impress for presentations. RetroPie for classic games. 4. Use Wireless Peripherals A Bluetooth or RF keyboard/mouse setup makes controlling the Pi from a distance easier. 5. Manage Cables Use Velcro ties or cable organizers to reduce clutter and prevent accidental disconnections. Conclusion Connecting your Raspberry Pi to a projector in 2025 is easier than ever, thanks to improved video output capabilities, software support, and plug-and-play compatibility. Whether you're using it for education, entertainment, or creative expression, this setup opens up a world of big-screen possibilities at a low cost. With the right cable, basic configuration, and a few tweaks, your Raspberry Pi can deliver stunning visuals through any compatible projector. So power up your Pi, plug in your projector, and explore the vast potential of your DIY home cinema, digital dashboard, or interactive presentation system. Ready to level up your Raspberry Pi experience? Try it with Kodi, set up RetroPie, or even build a wireless media streamer — the only limit is your imagination!
0 notes
Text
Best Python Coding Kits for Kids and Teens
Python is a great programming language for beginners, especially kids and teens. It’s easy to learn, versatile, and used in many areas, such as game development, data science, and even robotics. Python's simple structure makes it perfect for young learners, allowing them to grasp programming basics quickly. If your child or teen is interested in coding, Python kits can make learning fun and interactive.
This article will guide you through some of the best Python coding kits for kids and teens. These kits help kids build skills through hands-on projects while making coding enjoyable.
1. Kano Computer Kit
The Kano Computer Kit is a fun way for kids and teens to learn coding while building their own computer. The kit includes a Raspberry Pi, keyboard, and screen. It also comes with a step-by-step guide to help them learn how to code using Python. Kano’s interactive lessons are simple and engaging, letting kids create games, websites, and animations. This kit is designed for kids as young as 6, but it’s great for any beginner who wants to learn coding through play.
Key Features:
Build a computer from scratch
Uses Python to teach coding in fun ways
Great for kids 6 and up
2. Raspberry Pi Starter Kit
The Raspberry Pi Starter Kit is an affordable and powerful option for kids and teens who want to dive into Python programming. The Raspberry Pi is a small computer that can be connected to various devices and used for projects. This kit includes all the necessary components to get started, such as a Raspberry Pi, power supply, and cables. Kids can explore Python programming through exciting projects like creating games or building robots. It’s perfect for teens who want to learn coding while experimenting with hardware.
Key Features:
A small, affordable computer
Learn Python by building projects
Ideal for teens who enjoy working with tech
3. Piper Computer Kit
The Piper Computer Kit allows kids to learn coding by building their own computer with a Raspberry Pi. What makes Piper unique is its hands-on workbook with coding challenges. The kit uses a visual programming language based on Python, making it easier for kids to understand programming concepts. It’s perfect for children aged 8 and up, encouraging them to think creatively while solving coding problems.
Key Features:
Build your own computer with Raspberry Pi
Learn coding through interactive challenges
Suitable for kids 8 and up
4. Arduino Starter Kit
The Arduino Starter Kit is great for teens who are interested in electronics and coding. Arduino is a platform that lets users create interactive projects, such as robots, sensors, and smart devices. While the primary language for Arduino is C, Python can also be used with certain libraries, allowing teens to practice coding while working on hardware projects. If your teen is interested in both coding and building things, the Arduino kit is an excellent choice.
Key Features:
Create interactive electronics projects
Supports Python coding with special libraries
Ideal for teens interested in robotics and hardware
5. Tinkercad and Codeblocks (Online)
Tinkercad is a free online platform that lets kids and teens design 3D models. It also includes a Python coding tool called Codeblocks, where users can control their designs with code. This is a great way for kids to learn Python by programming their 3D creations. It’s an excellent choice for kids who enjoy digital design and want to learn how coding affects what they see on screen.
Key Features:
Free online platform for coding and 3D design
Python-based coding tool
Great for creative kids and teens
6. Adafruit Circuit Playground Express
The Adafruit Circuit Playground Express is a small programmable board that comes with built-in sensors and LEDs. It’s a fun way to learn Python programming while also experimenting with electronics. Kids can start by writing Python code to light up LEDs, measure temperature, or make sounds. The kit supports both block-based programming and Python, making it an excellent choice for beginners, especially younger kids.
Key Features:
Programmable board with sensors and LEDs
Learn Python while creating fun projects
Great for younger kids and beginners
7. CodeCombat
CodeCombat is an online game where kids and teens learn coding by solving challenges. The game uses Python as its programming language, allowing players to write code to control characters and solve puzzles. It’s a fun and interactive way for kids aged 9 and up to learn Python in a game-like setting. The game is designed to teach coding step-by-step, making it suitable for beginners as well as those with some experience.
Key Features:
Learn Python through an online game
Great for kids 9 and up
Fun, interactive coding challenges
8. Thames & Kosmos Robotics Coding Kit
For kids who want to combine coding with robotics, the Thames & Kosmos Robotics Coding Kit is a fantastic option. This kit lets kids build a robot and code it using Python. The kit includes motors, sensors, and a controller, offering endless possibilities for fun projects. It’s perfect for teens who are interested in programming and robotics and want to learn coding through hands-on activities.
Key Features:
Learn Python through robotics
Build and program a robot
Ideal for teens interested in engineering
Conclusion
Python is a wonderful language for kids and teens to start learning programming, and these kits make it easier and more fun. From building computers with Kano to creating robots with Thames & Kosmos, these kits provide hands-on learning experiences that engage young learners. Whether your child is interested in electronics, gaming, or design, there’s a Python coding kit that fits their interests.
If you're looking for a simple and effective way to get started with Python, check out the Python Starter Kit from Crafting Table. This kit is designed to be beginner-friendly, making it a perfect starting point for young coders. It’s a great tool for developing programming skills and sparking creativity, giving kids and teens a solid foundation in coding while having fun.
0 notes
Text
Which Are the Most Advanced Electronic Laboratory Equipment for Education in India?

Electronic laboratory equipment is an integral part of educational institutions, where it allows the student to gain some practical experience regarding electrical and electronic concepts. Since technology is always under innovation, modern laboratories require good quality and innovative implements to enhance the learning experience in laboratories. Finding the right electronic laboratory equipment manufacturer and supplier in India is the right degree of precision, reliability, and durability. With advanced Electronic laboratory equipment, students learn technical skills along with a practical understanding of circuits, microcontrollers, and communication systems. In this blog, we mentioned some of the most advanced electronic laboratory equipment for education in India.
8 Most Advanced Electronic Laboratory Equipment for Education in India
Digital Oscilloscope
A digital oscilloscope is an essential measuring and analyzing device for electrical signals in real time. It has become a crucial teaching tool for students in many educational labs teaching waveforms, voltage levels, and signal analysis. Modern oscilloscopes are high bandwidth, touch screen, and with advanced triggering, making them quite efficient for the student to learn.
Function Generator
A function generator is an essential device used to generate different kinds of electrical waveforms, like sine, square, and triangular waves. The function generator is mainly used for circuit testing in educational laboratories or for research projects. Advanced models have frequency modulation, phase-locking capabilities, and digital control for precision.
According to Wikipedia, In electrical engineering, a function generator is usually a piece of electronic test equipment or software used to generate different types of electrical waveforms over a wide range of frequencies. Some of the most common waveforms produced by the function generator are the sine wave, square wave, triangular wave and sawtooth shapes.
Spectrum Analyzer
Spectrum analyzers measure the electric signal frequency spectrum. They teach students about signal strength, bandwidth, and distortion from communication systems. Modern spectrum analyzers include high-speed digital processing, a touchscreen interface, and wireless connectivity for remote monitoring.
Digital Multimeter
It is an essential tool used in measurements of voltage, current, and resistance. The modern Digital Multimeter offers high resolution, data logging, Bluetooth connectivity, and more, so it is a good educational tool.
Microcontroller Development Board
Embedded microcontroller development boards such as Arduino and Raspberry Pi are used in educational institutions to teach students the fundamentals of an embedded system. With this board, students will be able to develop real-time applications, offering a practical platform in terms of programming and integration of hardware into software.
Power Supply Unit
Testing and powering electronic circuits require a regulated power supply. In a modern power supply, digital displays along with programmable voltage settings and overcurrent protection safeguard the integrity of experiments in the laboratory.
Soldering and Desoldering Station
Soldering stations are the stations used to assemble and repair electronic circuits. A high-class soldering station, with highly sensitive temperature regulation and ESD-protected working features, includes high-speed heating for student learning through PCB designing and repairing techniques.
Wireless Communication Trainer Kit
A wireless communication trainer kit is intended to help the student understand a number of different wireless technologies such as Bluetooth, Wi-Fi, and RF communication. These kits make it possible to demonstrate complex wireless concepts with practical demonstrations and experiments.
Enhancing Engineering Education in India through Advanced Electronic Laboratory Equipment
In accordance with a research study done by Smart Learning Environments, adding high-technology Electronic laboratory equipment, including augmented reality (AR) systems in the educational process of engineering improves the level of practical skills and students' understanding of complex contents. The analysis showed that students trained by using AR tools improved their skills for working with laboratory instruments like an oscilloscope and a function generator and obtained better practice-based assessment results. This helped build not only confidence but also relieved the cognitive load of having their familiarization with equipment through virtual devices before the real experiment was undertaken. Such advanced tools in engineering curricula at Indian colleges help close that gap between the knowledge acquired and the moment of practical application, hence setting up an effective learning environment.
Why Choose Eduscope India?
Eduscope India is the leading electronic laboratory equipment manufacturer and supplier in India, that offers high-quality innovative and educational solutions for laboratories. Steady on precision and durability, products from Eduscope India address the latest industry standard.
This equipment helps in learner practice and real-time experiments to boost students' learning abilities. In addition, Eduscope India offers extended support by providing proper installation, training, and maintaining all its products.
Conclusion
Electronics Laboratory Equipment for students is something that needs to be chosen right to provide the students with practical experience and technical know-how. The advanced laboratory equipment mentioned above increases the efficiency of learning by providing the student with problem-solving skills and innovation. For any institution looking for the best electronic laboratory equipment manufacturer and supplier in India, Eduscope India is one of the finest, with its commitment to quality, reliability, and customer support. A laboratory investment in quality helps to prepare future-ready learning environments in electronics preparation for real-world applications.
#electronic laboratory equipment manufacturer and supplier in india#electronic laboratory equipment manufacturer and supplier#electronic laboratory equipment manufacturer
0 notes
Text
Deep Learning Projects With Source Code | Takeoff
At Takeoffprojects, we have a team of deep learning experts backed by extensive resources and research infrastructure. Our team has successfully created and completed hundreds of deep-learning projects in various fields over the past few years. If your project is stuck, our experts can provide the guidance you need to get it back on track. If you're looking for complete Deep Learning Projects With Source Code, Takeoff projects can deliver them to you with full support and assistance.

Face Recognition Door Lock System Using Raspberry Pi
This project focuses on the application of Raspberry Pi and a USB camera and it involves designing a face recognition door lock system. It also has and an LCD screen where feedback is displayed and a buzzer which provides an alarm notification. The objective is as follows: improving security and permitting the entry to the restricted area only to the authorized persons using facial recognition and, in turn, producing an alert if there is an attempt of unauthorized access.
The core of this system is the Raspberry Pi, which provides software options for face detection and recognition. The USB camera is initialized to the raspberry Pi and it takes frames of faces around the door as they occur. If somebody appears in front of the camera, a picture of that person is captured and the Raspberry Pi scans it against to the current database of faces.
A Glove that Translates Sign Language into Text and Speech
Basically, it is hard for the deaf or disabled person to relate to other people especially those who do not know sign language. Hand Talk glove is an ordinary cloth driving glove with installed flex sensors. The sensors provided an array of data flow that depends on the degree of bend in the fingers. Flex sensors are sensors that change with resistance so as to tell the amount of bend on the sensor. They manipulate the change in bend into electrical resistance –the more the bend, the more the resistance value. The output from the sensor is in an analog form and after being converted into digital form, it is processed with the help of microcontroller and it speaks in the voice through the speaker.
Conclusion:
Deep Learning Projects With Source Code is not a service you hand over to just any team; at Takeoff Projects, we have a team of experts and crew to support the projects. They include the Face Recognition Door Lock System, and the Sign Language Glove that discover us our proficiency in real-life implementations. Trust Takeoffprojects for the full solution and unique approaches for enhancing your opportunities for success in deep learning projects.
#Deep Learning Projects#Deep Learning Projects with Source Code#Deep Learning Projects for Beginners#Deep Learning Projects for Final Year#Deep Learning Project Ideas#Deep Learning Project
0 notes
Text
Minisforum MSS-A156 Portable Monitor With Many Features

Minisforum MSS-A156 Monitor
Minisforum has announced the MSS-A156 Portable Monitors, which are mobile monitors with a screen size of 15.6 inches, 144 hertz, 1440p resolution, and a retail price of $189. By providing extra screen real estate for a range of applications, this 15.6-inch portable monitor, which features a thin and lightweight design and a high resolution of 2K, boosts both entertainment and productivity. by refreshing the display 144 times per second, it provides a display effect that is more precise and detailed! Gamers are able to gain speedier feedback and pick up on the finer elements in the game when they play in a highly dynamic setting where even the unaided eye can see a smooth and detailed screen.
This allows gamers to get a better experience throughout the game. An improved visual experience is provided by the 2K resolution, which consists of 2560 by 1440 pixels and yields images that are clear and detailed for both work and playtime. The use of vivid colours and precise details enhances the sense of realism and involvement, regardless of whether you are playing a video game or viewing a movie.
Minisforum MSS-A156 Angle
This monitor’s broad 178° viewing angles and IPS panel ensure that genuine colours are correctly reproduced, making it ideal for professional image processing and design jobs that boost productivity.
Interactive 10-point touch displays offer a very precise and responsive touch experience, enabling users to sketch or create with ease and expand content with a simple fingertip drag. They can also do more flexible gestures to effortlessly complete routine documents. The display powers up simultaneously when connected with the included USB Type-C cable, making it simple to set up only one cable for effective plug-and-play functionality. Additionally provided is simple monitor switching.
The other display, When paired with the touchpad feature, it may be utilised as a drawing board in addition to serving as an additional monitor for your computer, making multitasking simple. In business communication, you can exchange information quickly and wisely, which improves the efficiency and intelligence of your work.
Its large colour gamut, excellent colour reproduction, and 100% DCI-P3 coverage deliver a visual experience comparable to that of a movie theatre. Higher contrast, achieved by brightness levels between 0.0005 and 400 nits, enables users to view high-resolution digital camera photographs and movies with excellent clarity and image quality. Minisforum is always expanding its line of products, and the Minisforum MSS-A156 portable monitor is the latest addition. The monitor’s 15.6-inch size is indicated by its name, but other specifications include 100% DCI-P3 colour coverage, 144 Hz refresh rate (with FreeSync), 2560 x 1440 resolution, and 10-point touch capabilities. Minisforum MSS-A156 is currently retailing for $189.
Increasing productivity while on the go is the goal of the best portable monitors. Adding a second screen to a laptop might be a reasonably common use-case, giving the user who is travelling from hotel to hotel twice as much screen space. However, there have been a few portable monitors that may be appealing to gamers; the Minisforum MSS-A156, with its quick refresh rate and FreeSync compatibility, may suit this need.
According to Minisforum, the display features an HDR option, broad viewing angles, and a 1,000:1 contrast ratio all characteristics of an IPS panel. It can also reach up to 400 nits of brightness.
Along with being lightweight, durable, and equipped with the ports you require for communication, portable displays should also be small. When travelling, a portable monitor can act as an additional screen for your laptop, a small display for a Raspberry Pi project, a way to test a desktop computer that’s still on your workbench, or even a way to connect a gaming console while on vacation. Excellent visual quality, portability, robust use, and an abundance of connectivity choices are all features found in the best portable monitors.
According to Minisforum, the MSS-A156 dimensions 357 x 223 x 4 mm; however, we believe that the 4 mm measurement only applies to the monitor’s narrowest part. It appears thicker at the area containing the ports and actual controls. Again, there is some ambiguity surrounding this specification: we are not clear if the weight of the Minisforum MSS-A156 includes the magnetic protective case that doubles as a stand. It is stated to weigh 900 g, or roughly two pounds. An aluminium alloy is used to make this monitor.
Landscape and portrait monitor modes are made possible by the magnetic case/stand. You will need to make changes to your operating system as there isn’t a sensor that can automatically adjust this for you.
One USB Type-C connection is all that’s needed to operate the Minisforum MSS-A156. According to Minisforum, the display may be connected to PCs, tablets, cellphones, gaming consoles, and cameras. While the majority of contemporary devices support USB Type-C, older devices can still be connected via a Micro USB connector, power adapter, and Mini HDMI connection. Along with the + and – keys and the on/off switch, the bezel also has a headphone jack for adjusting the OSD. And last, this portable display has stereo 1W speakers integrated within it.
Minisforum made the announcement on its Discord channel that the Minisforum MSS-A156 Portable Monitor is now available on their website through both their US and Japanese stores. We discovered that the US connection also had links for buyers from the UK and the EU. The Minisforum MSS-A156 is currently being offered for $189, which is $34 less than the original price. The duration of that is unknown.
Read more on Govindhtech.com
#govindhtech#news#technologynews#Technology#TechnologyTrends#minisforum#mssa156#Monitor#portblemonitor
0 notes
Link


#leddisplay#leddisplaylight#flexibleled#raspberry pi screen#raspberry pi flexible screen#led screen#raspberry pi digital screen
0 notes
Photo


god i love this series so much
edit: image ids under the cut
image 1: image id: a tumblr post edited to look like characters from the ace attorney series are speaking. phoenix wright says “as soon as i’m under a blanket it’s over” with a confident expression. end id
image 2: image id: a tumblr post edited to look like characters from the ace attorney series are speaking. athena cykes says “i enjoy video games because they let me live out my wildest fantasies, like being assigned a task and then completing that task” with a pleased expression. end id
image 3: image id: a tumblr post edited to look like characters from the ace attorney series are speaking. kay faraday says “listening to music isn’t enough anymore i need to eat it” with a determined expression. end id
image 4: image id: a tumblr post edited to look like characters from the ace attorney series are speaking. franziska von karma says “my gay little cat screams and cries if i kick him out of my room he wails and sounds like hes dying and it picks up on my mic and my friends and partners shout “LET HIM IN YOURE KILLING HIM” and i look into his dumb little eyes and know that theres not a single fucking thought behind them” with an annoyed expression. end id
image 5: image id: a tumblr post edited to look like characters from the ace attorney series are speaking. maya fey says “i dont like working i dont like capitalism but i do like ordering little treats online” with a happy expression. end id
image 6: image id: a tumblr post edited to look like characters from the ace attorney series are speaking. athena cykes says “the time difference between 7:39 and 4:40 is 5 million years” with a neutral expression while looking at widget’s screen. she then says “7:39 = oo ive got plany off time” with a happy expression before saying “7:40 = SHIT!!! FUCK!!!” with a distraught expression. end id
image 7: image id: a tumblr post edited to look like characters from the ace attorney series are speaking. pearl fey says “i dont understand why they made raspberries” with a nervous, confused expression. young trucy wright replies “blackberries needed a luigi” with a happy expression. pearl responds “you are so right” with a shocked expression. end id
image 8: image id: a tumblr post edited to look like characters from the ace attorney investigations games are speaking. ema skye says “i just listened to this guy recite pi to 50 digits to some woman on the bus except i also have pi memorized to 50 digits and he fucking got all of them wrong” with a happy expression. sebastian debeste is vaguely superimposed over her words. end id
image 9: image id: a tweet edited to look like characters from the ace attorney series are speaking. trucy wright says “The whole “remove distractions and then u will concentrate” thing underestimates my power. I’ll hide my phone from myself and will still zone out with my eyes unfocused staring unmoving at this word document for 5 minutes at a time dont try me” with a silly, sheepish expression. end id
image 10: image id: a tumblr post edited to look like characters from the ace attorney series are speaking. miles edgeworth says “the sexual tension between me and disappearing forever” with a pained expression. end id
#ace attorney#ace attorney text posts#phoenix wright#athena cykes#kay faraday#franziska von karma#maya fey#pearl fey#trucy wright#ema skye#sebastian debeste#miles edgeworth#turnabout queue#og post
363 notes
·
View notes
Text

terrible picture, but earlier tonight i set up this little 4.5” screen mounted on a raspberry pi mounted to the wall in my office to just display a random gif every 60 seconds. (after spending days trying to find a digital picture frame that supports GIFs.) btw apparently the GIF is dead, rip.
50 notes
·
View notes
Text
McDonald's corporate wages war on ice-cream hackers

A new feature by Andy Greenberg for Wired on the bizarre fight over diagnostic/control tools for McDonald's soft-serve machines is a fantastic, fascinating look at the intersection of Right to Repair with hardware hacking, corporatism, and franchising.
https://www.wired.com/story/they-hacked-mcdonalds-ice-cream-makers-started-cold-war/
McDonald's ice-cream machines are notoriously finicky, so much so that people make bots to determine whether your local McD's machines are busted (5-16% of these machines are broken at any time)
https://mcbroken.com/

There's a reason these machines go down all the time: they are absurdly mechanically complex, designed to do overnight repastueruizations on leftover ice-cream mix, unlike less complex machines that have to be drained and cleaned every day, at high labor and wastage costs.
There's a tradeoff: the machines are *much* more complex and finicky. Not only do they fail if the reservoirs are outside of a narrow tolerance, they still have to be disassembled for weekly cleaning, and are *much* harder to reassemble.
Moreover, that maintenance is performed by McDonald's employees, and thanks to low pay and high turnover, those workers are often both very young and very new to the job. Put it all together and it's easy to see why the machines are busted so often.
But that's not the whole story: it turns out that all of this is vastly exacerbated by the repair-hostile design of the machines. When they do break down, they throw cryptic errors, necessitating an expensive service call.
This means that franchisees pay through the nose when their machines break *and* they don't get feedback on what they can do differently to prevent more service-calls in the future. The tale of this user-hostility is the crux of Greenberg's piece.
The machines are made by Taylor, a giant kitchen supply company that also supplies things like grills to McDonald's franchises. Their distributors get paid every time they do a service call, and the franchisees are pretty sure McD's is getting a cut.
That's where Kytch comes in. It's a tech startup that spun out of Frobot, a company that built automated enclosures for Taylor's froyo machines that were supposed to eliminate labor costs by creating fully self-serve systems.
Frobot machines proved to be too complex and unreliable for the field, and in the process of outfitting them with diagnostic tools, Frobot's founders created Kytch, a high-powered automation and diagnostic tool that proved to be hugely popular with McDonald's franchisees.
Kytch gave these restaurateurs the ability to monitor and diagnose their $18,000 Taylor C602 machines without having to learn technicians' secret, obscure codes ("Press the cone icon, then tap the snowflake/milkshake buttons to set the screen to 5, then 2, then 3, then 1").
It was a runaway success: franchisees bought the gadgets and paid activation and recurring fees and were glad of it, reporting major cost savings over paying Taylor's service techs and extra profits because they could sell product rather than apologizing for broken machines.
The gadget itself was superbly engineered, thanks, no doubt, to its pedigree: in commercializing the Kytch, its inventors teamed up with legendary hardware hacker and digital freedom fighter Andrew "bunnie" Huang, whose every device is a perfect marvel.
Huang describes Kytch as a huge leap in the control systems for the Taylor machines, which were mired in the "dark ages" of 50-year-old technology. Adding a Raspberry Pi-based controller took the machines from the late mechanical age to the late digital age in one step.
But this reformation met a counter-reformation. McDonald's and Taylor teamed up to crush Kytch. Taylor engaged in all kinds of skullduggery to acquire a Kytch unit and then rolled out a (less capable, more lucrative, more extractive) competitor.
(The company swears it didn't rip off the Kytch and it's all just a huge coincidence, really.)
But the real muscle came from McDonald's, which owns the land underneath each of its franchisees' restaurants and can take away their restaurants at the stroke of a pen.
McDonald's began to traffick in increasingly unhinged scare-memos, warning that Kytch might steal "confidential data" and that it "creates a potential very serious safety risk for the crew or technician attempting to clean or repair the machine."
The memos conclude that this diagnostic and monitoring device could cause "serious human injury" and "McDonald’s strongly recommends that you remove the Kytch device from all machines and discontinue use."
Kytch's founders confide that this will probably kill their business.
It's quite a tale: a clanking, breakdown-prone Rube Goldberg device that's turned into a money-spinner for a giant corporation that values the service charges more than it rues its disappointed customers.
A pair of scrappy inventors and a legendary hardware wizard who transport this gadget half a century forward in one fell swoop - and who get destroyed by the corporate behemoth through a mix of scare-stories about maimed teenage shake-jockeys and eviction threats.
Image: Gabriela Hasbun/Wired
https://www.gabrielahasbun.com/
111 notes
·
View notes
Text
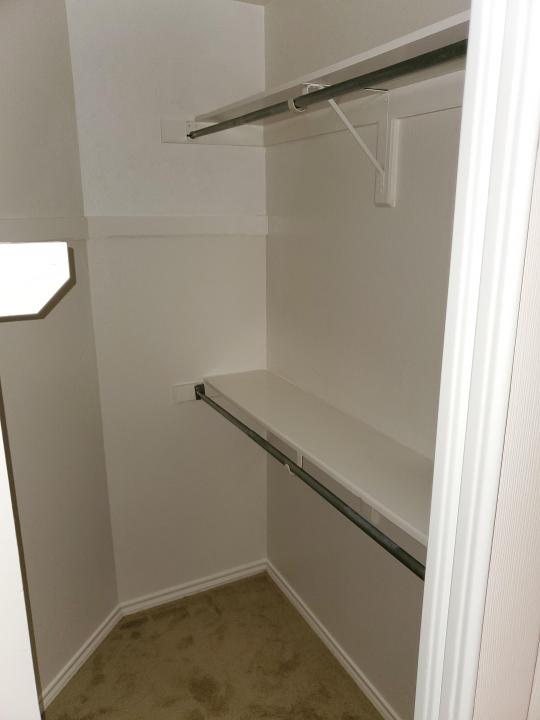
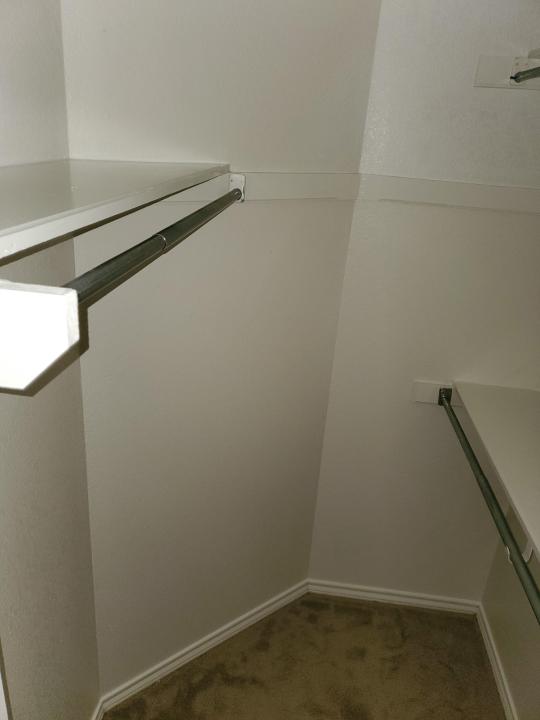
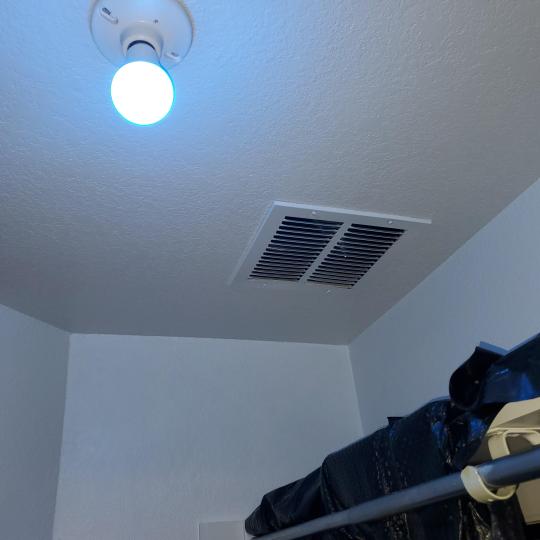
My Homelab/Office 2020 - DFW Quarantine Edition
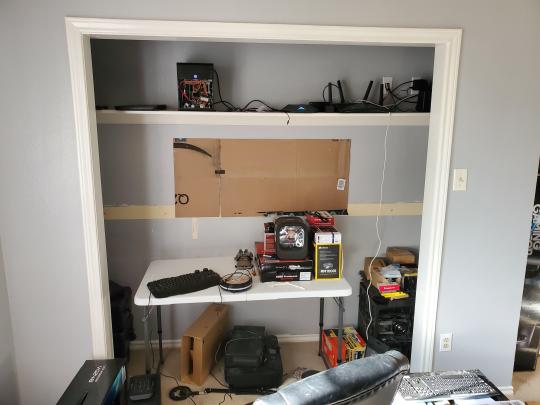
Moved into our first home almost a year ago (October 2019), I picked out a room that had 2 closets for my media/game/office area. Since the room isn't massive, I decided to build a desk into closet #1 to save on space. Here 1 of 2 shelves was ripped off, the back area was repainted gray. A piece of card board was hung to represent my 49 inch monitor and this setup also gave an idea how high I needed the desk.
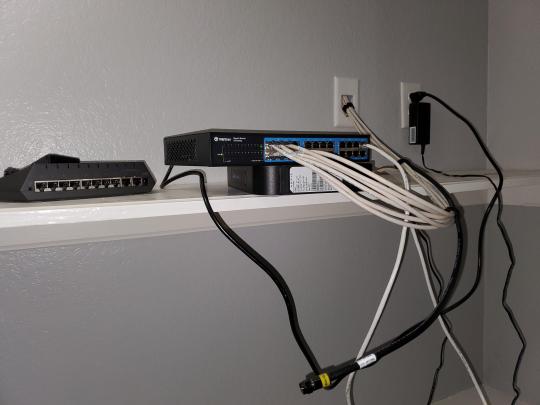
On my top shelf this was the initial drop for all my Cat6 cabling in the house, I did 5 more runs after this (WAN is dropped here as well).
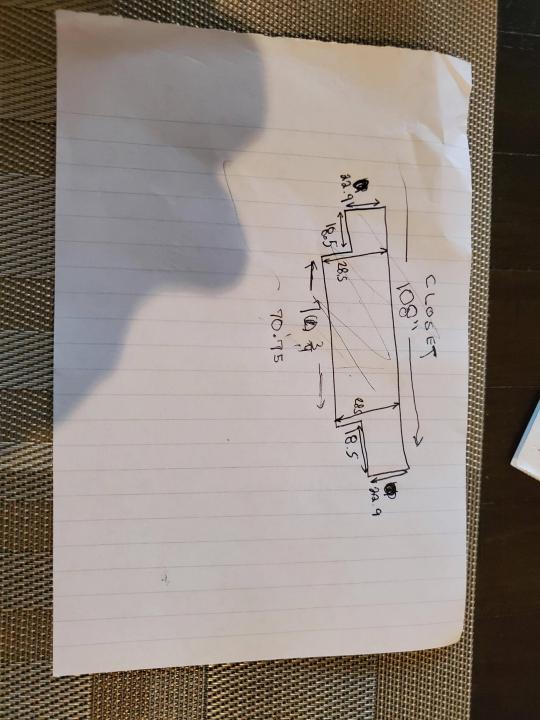
I measured the closet and then went to Home Depot to grab a countertop. Based on the dimensions, it needed to be cut into an object shape you would see on Tetris.

Getting to work, cutting the countertop.
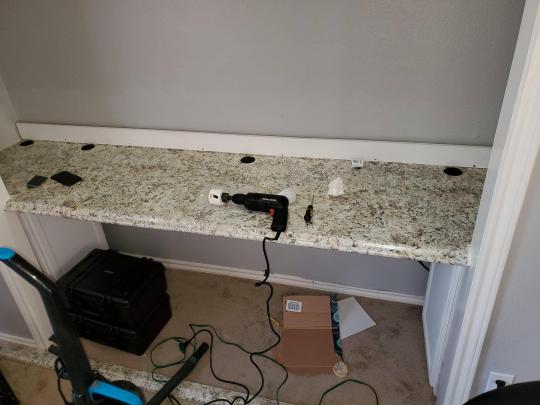
My father-in-law helped me cut it to size in the driveway and then we framed the closet, added in kitchen cabinets to the bottom (used for storage and to hide a UPS). We ran electrical sockets inside the closet. I bought and painted 2 kitchen cabinets which I use for storage under my desk as well.
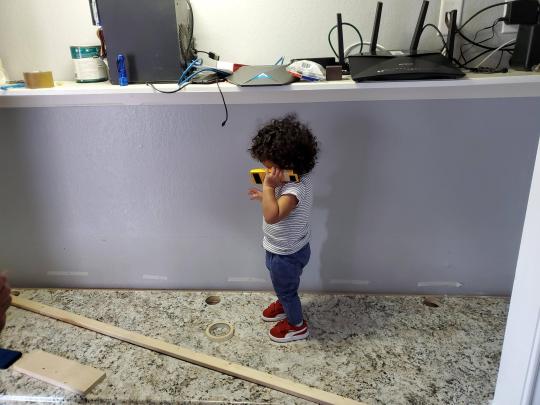
The holes allowed me to run cables under my desk much easier, I learned many of these techniques on Battlestations subreddit and Setup Wars on Youtube. My daughter was a good helper when it came to finding studs.
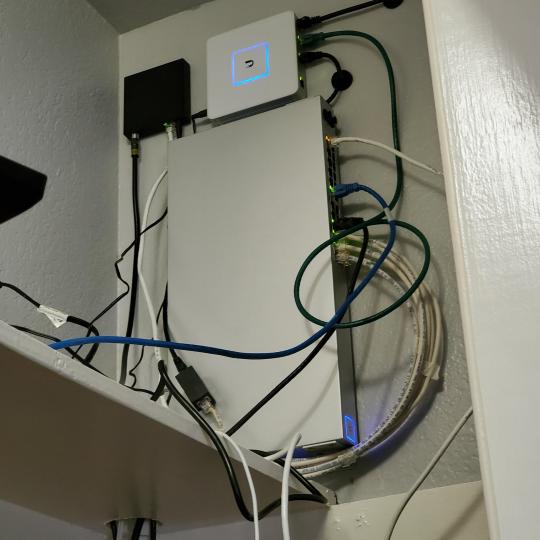
Some of my cousins are networking engineers, they advised me to go with Unifi devices. Here I mounted my Unifi 16 port switch, my Unifi Security Gateway (I'll try out pfSense sometime down the line), and my HD Homerun (big antenna is in the attic). I have Cat6 drops in each room in the house, so everything runs here. On my USG, I have both a LAN #2 and a LAN #1 line running to the 2nd closet in this room (server room). This shot is before the cable management.
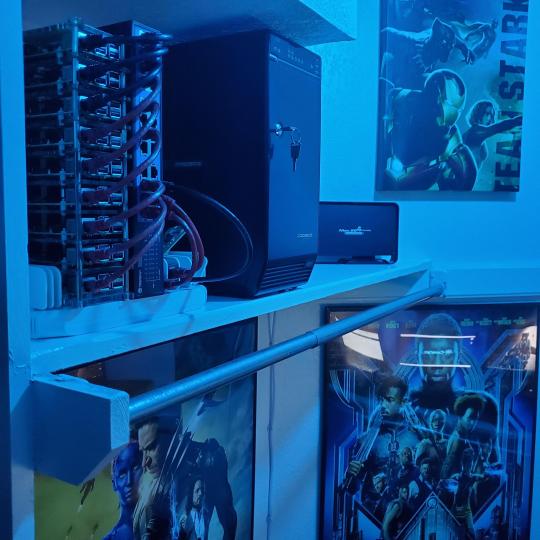
Cable management completed in closet #1. Added an access point and connected 3 old Raspberry Pi devices I had laying around (1 for PiHole - Adblocker, 1 for Unbound - Recursive DNS server, and 1 for Privoxy - Non Caching web proxy).
Rats nest of wires under my desk. I mounted an amplifier, optical DVD ROM drive, a USB hub that takes input from up to 4 computers (allows me to switch between servers in closet #2 with my USB mic, camera, keyboard, headset always functioning), and a small pull out drawer.
Cable management complete, night shot with with Nanoleaf wall lights. Unifi controller is mounted under the bookshelf, allows me to keep tabs on the network. I have a tablet on each side of the door frame (apps run on there that monitor my self hosted web services). I drilled a 3 inch hole on my desk to fit a grommet wireless phone charger. All my smart lights are either running on a schedule or turn on/off via an Alexa command. All of our smart devices across the house and outside, run on its on VLAN for segmentation purposes.
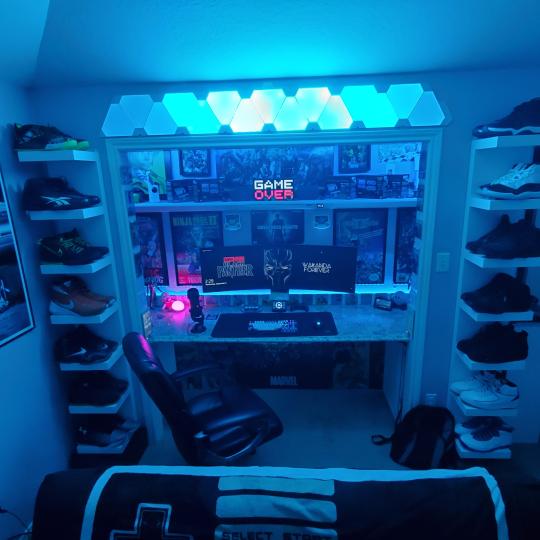
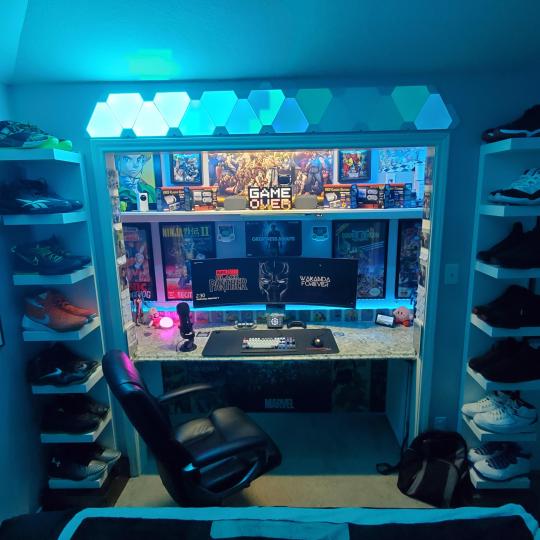
Quick shot with desk light off. I'm thinking in the future of doing a build that will mount to the wall (where "game over" is shown).
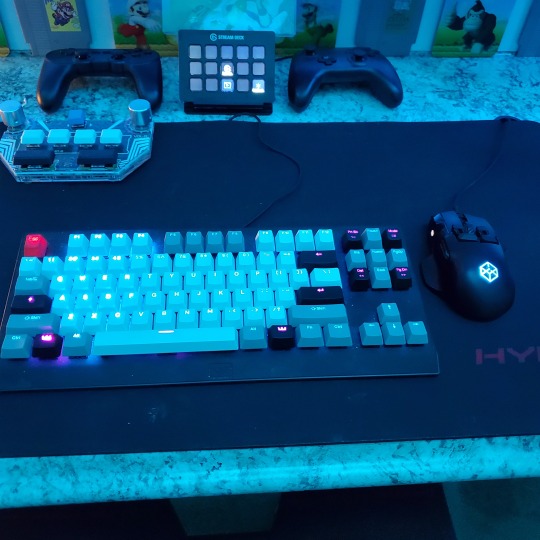
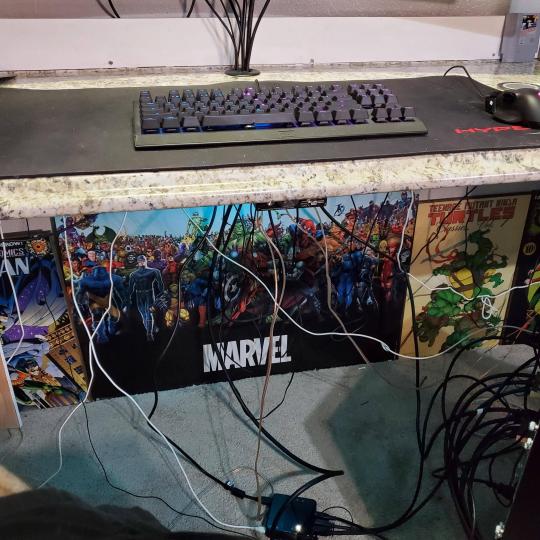
Wooting One keyboard with custom keycaps and Swiftpoint Z mouse, plus Stream Deck (I'm going to make a gaming comeback one day!).
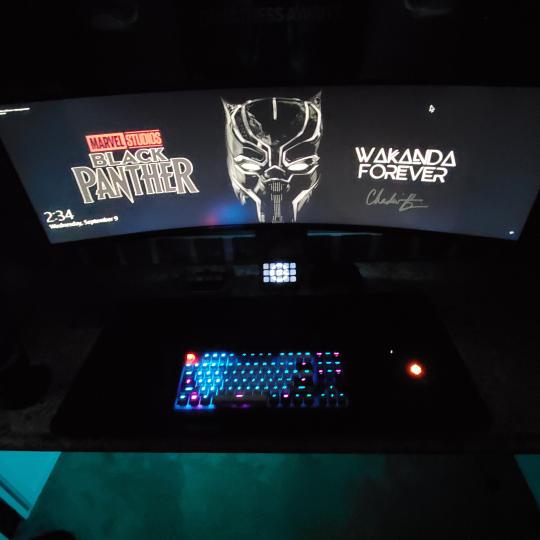
Good wallpapers are hard to find with this resolution so pieced together my own.
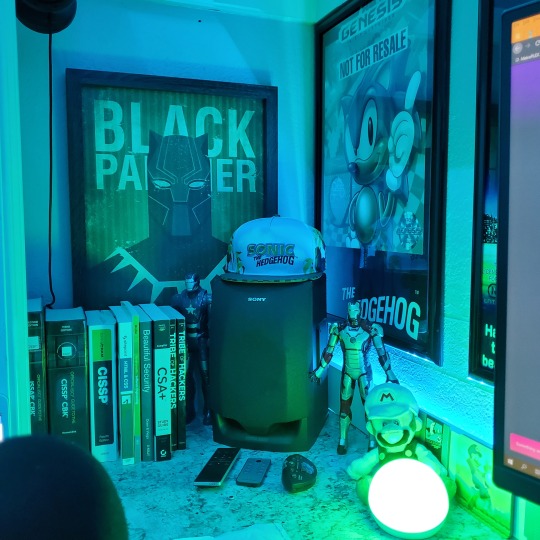
Speakers and books at inside corner of desk.
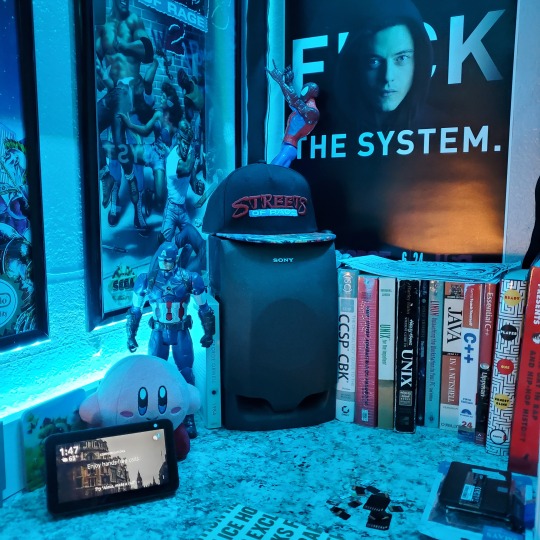
Speakers and books at inside corner of desk.
Closet #2, first look (this is in the same room but off to the other side). Ran a few CAT6 cables from closet #1, into the attic and dropped here (one on LAN #1, the other on LAN #2 for USG). Had to add electrical sockets as well.
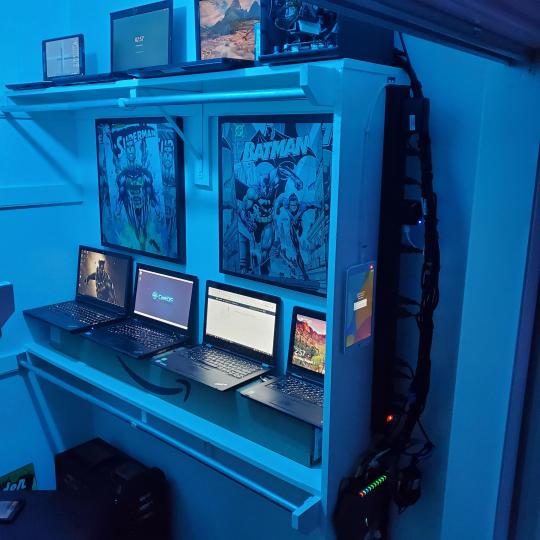
I have owned a ton of Thinkpads since my IBM days, I figured I could test hooking them all up and having them all specialize in different functions (yes, I have a Proxmox box but it's a decommissioned HP Microserver on the top shelf which is getting repurposed with TrueNAS_core). If you're wondering what OSes run on these laptops: Windows 10, Ubuntu, CentOS, AntiX. All of these units are hardwired into my managed Netgear 10gigabit switch (only my servers on the floor have 10 gigabit NICs useful to pass data between the two). Power strip is also mounted on the right side, next to another tablet used for monitoring. These laptop screens are usually turned off.
Computing inventory in image:
Lenovo Yoga Y500, Lenovo Thinkpad T420, Lenovo Thinkpad T430s, Lenovo Thinkpad Yoga 12, Lenovo Thinkpad Yoga 14, Lenovo Thinkpad W541 (used to self host my webservices), Lenovo S10-3T, and HP Microserver N54L
Left side of closet #2
**moved these Pis and unmanaged switch to outside part of closet**
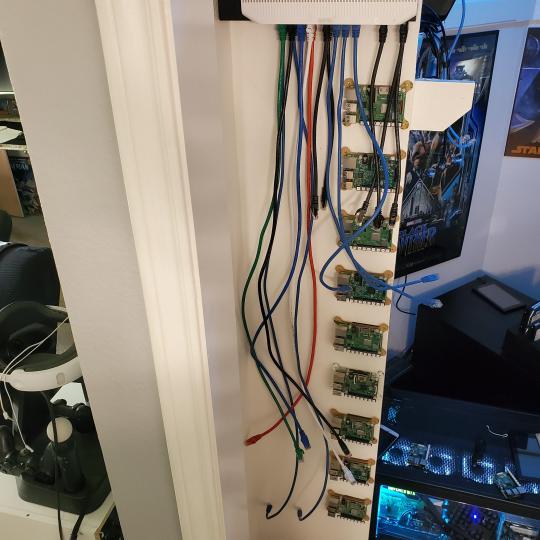
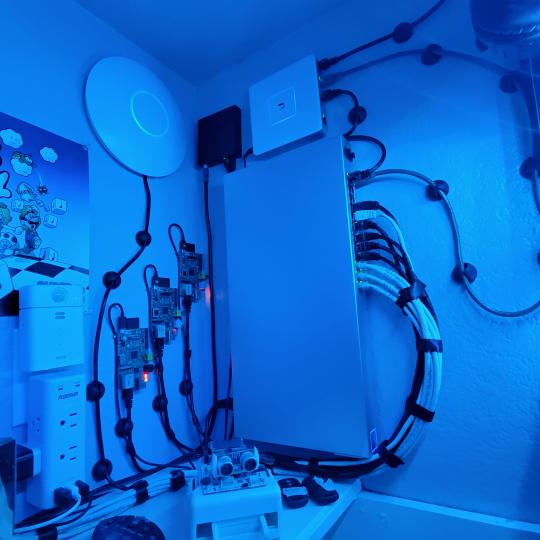
Since I have a bunch of Raspberry Pi 3s, I decided recently to get started with Kubernetes clusters (my time is limited but hoping to have everything going by the holidays 2020) via Rancher, headless. The next image will show the rest of the Pis but in total:
9x Raspberry Pi 3 and 2x Raspberry Pi 4
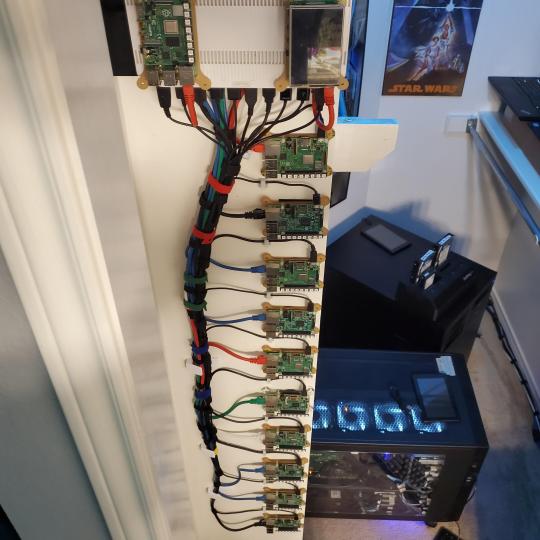
2nd shot with cable management. The idea is to get K3s going, there's Blinkt installed on each Pi, lights will indicate how many pods per node. The Pis are hardwired into a switch which is on LAN #2 (USG). I might also try out Docker Swarm simultaneously on my x86/x64 laptops. Here's my compose generic template (have to re-do the configs at a later data) but gives you an idea of the type of web services I am looking to run: https://gist.github.com/antoinesylvia/3af241cbfa1179ed7806d2cc1c67bd31
20 percent of my web services today run on Docker, the other 80 percent are native installs on Linux and or Windows. Looking to get that up to 90 percent by the summer of 2021.
Basic flow to call web services:
User <--> my.domain (Cloudflare 1st level) <--> (NGINX on-prem, using Auth_Request module with 2FA to unlock backend services) <--> App <--> DB.
If you ever need ideas for what apps to self-host: https://github.com/awesome-selfhosted/awesome-selfhosted
Homelabs get hot, so I had the HVAC folks to come out and install an exhaust in the ceiling and dampers in the attic.
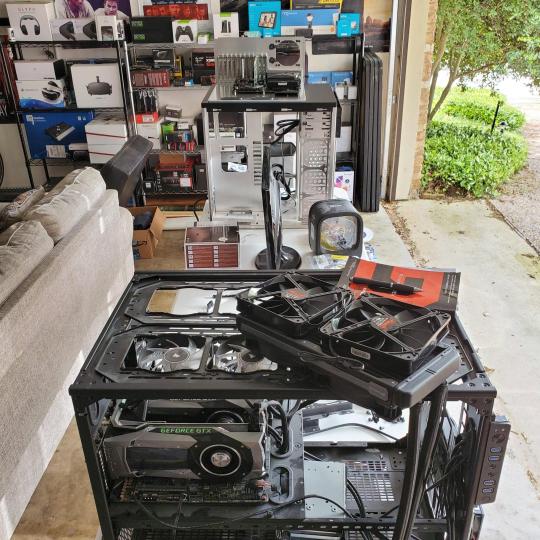
I built my servers in the garage this past winter/spring, a little each night when my daughter allowed me to. The SLI build is actually for Parsec (think of it as a self hosted Stadia but authentication servers are still controlled by a 3rd party), I had the GPUs for years and never really used them until now.
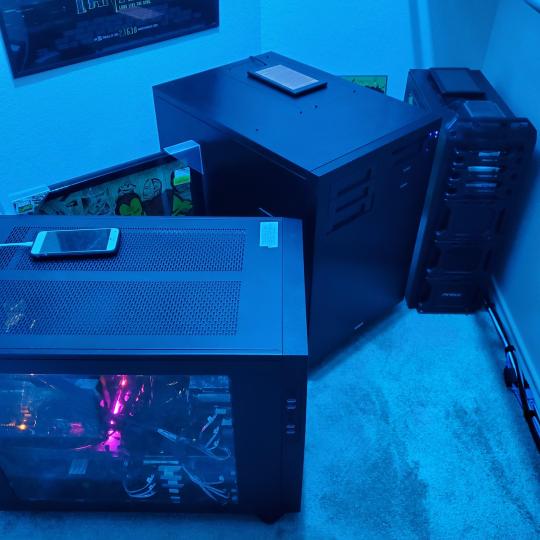
Completed image of my 2 recent builds and old build from 2011.
Retroplex (left machine) - Intel 6850 i7 (6 core, 12 thread), GTX 1080, and 96GB DDR4 RAM. Powers the gaming experience.
Metroplex (middle machine) - AMD Threadripper 1950x (16 core, 32 thread), p2000 GPU, 128GB DDR4 RAM.
HQ 2011 (right machine) - AMD Bulldozer 8150 (8 cores), generic GPU (just so it can boot), 32GB DDR3 RAM.
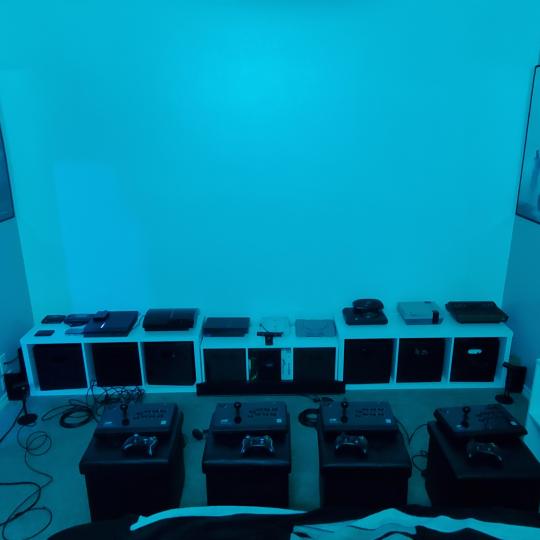
I've been working and labbing so much, I haven't even connected my projector or installed a TV since moving in here 11 months ago. I'm also looking to get some VR going, headset and sensors are connected to my gaming server in closet #2. Anyhow, you see all my PS4 and retro consoles I had growing up such as Atari 2600, NES, Sega Genesis/32X, PS1, Dreamcast, PS2, PS3 and Game Gear. The joysticks are for emulation projects, I use a Front End called AttractMode and script out my own themes (building out a digital history gaming museum).
My longest CAT6 drop, from closet #1 to the opposite side of the room. Had to get in a very tight space in my attic to make this happen, I'm 6'8" for context. This allows me to connect this cord to my Unifi Flex Mini, so I can hardware my consoles (PS4, PS5 soon)
Homelab area includes a space for my daughter. She loves pressing power buttons on my servers on the floor, so I had to install decoy buttons and move the real buttons to the backside.
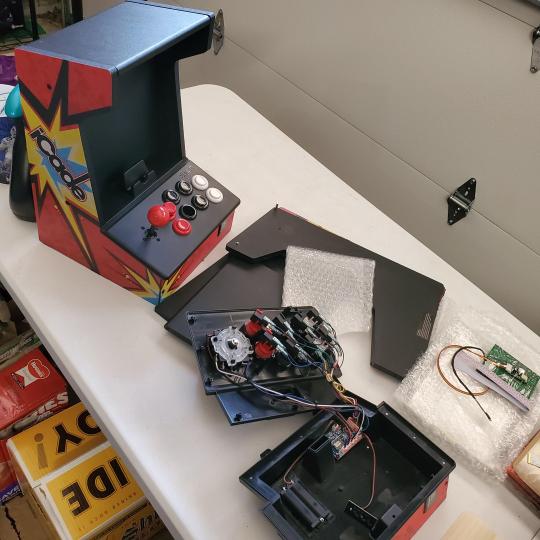
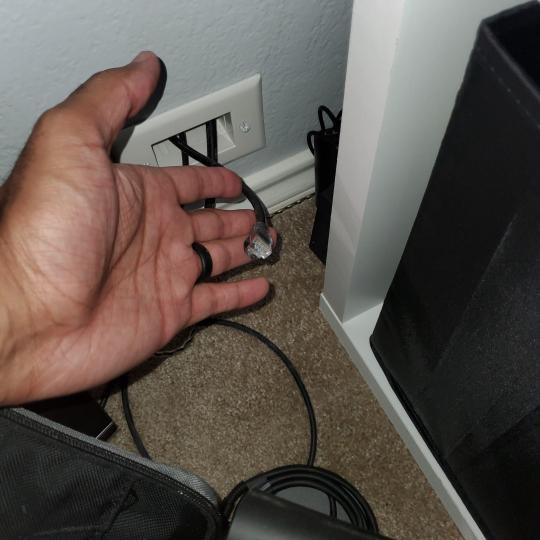
Next project, a bartop with a Raspberry Pi (Retropie project) which will be housed in an iCade shell, swapping out all the buttons. Always have tech projects going on. Small steps each day with limited time.
6 notes
·
View notes